Passbook, Transaction, and Document Printers
All Craden Printers Made in the USA
Header Content Region
Insert text, image or banner ads here, or just delete this text and leave this area blank!


Heading 1
This is an example of the content for a specific image in the Nivo slider. Provide a short description of the image here....
Heading 2
This is an example of the content for a specific image in the Nivo slider. Provide a short description of the image here....
Heading 3
This is an example of the content for a specific image in the Nivo slider. Provide a short description of the image here....
Heading 4
This is an example of the content for a specific image in the Nivo slider. Provide a short description of the image here....


Info Left
This is simply dummy text of the printing and typesetting industry. Lorem Ipsum has been the industry's standard dummy text ever since the 1500s.

Info Center
This is simply dummy text of the printing and typesetting industry. Lorem Ipsum has been the industry's standard dummy text ever since the 1500s.

Info Right
This is simply dummy text of the printing and typesetting industry. Lorem Ipsum has been the industry's standard dummy text ever since the 1500s.
Proper Ribbon Installation in DP8 & DP9
For trouble free printing, there is only one way to properly install a ribbon
in the DP8 or DP9.
In the last few years, we have seen several creative ribbon installations in the
printhead, ribbon guide plate, ribbon shield area. Below are representations of
the only correct way which avoids such issues as poor print quality, carriage
stalls, and too much ribbon left out of the cartridge to snarl documents.
Directly below: the ribbon fabric has been colored red to give better contrast to the picture.

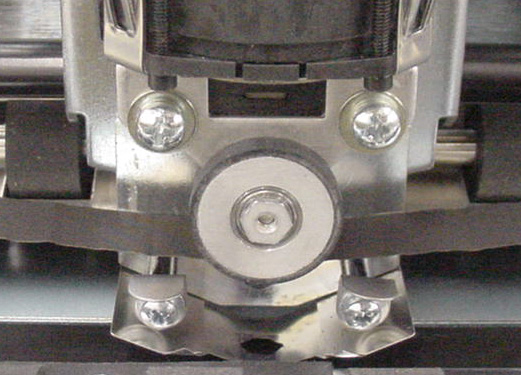
In this picture the ribbon guide plate and shield have been pushed down to give a clearer picture. This is more like what you will see after tightening the ribbon with the ribbon drive knob on the cartridge, Don't forget to push the ribbon shield ALL THE WAY up as your last step.